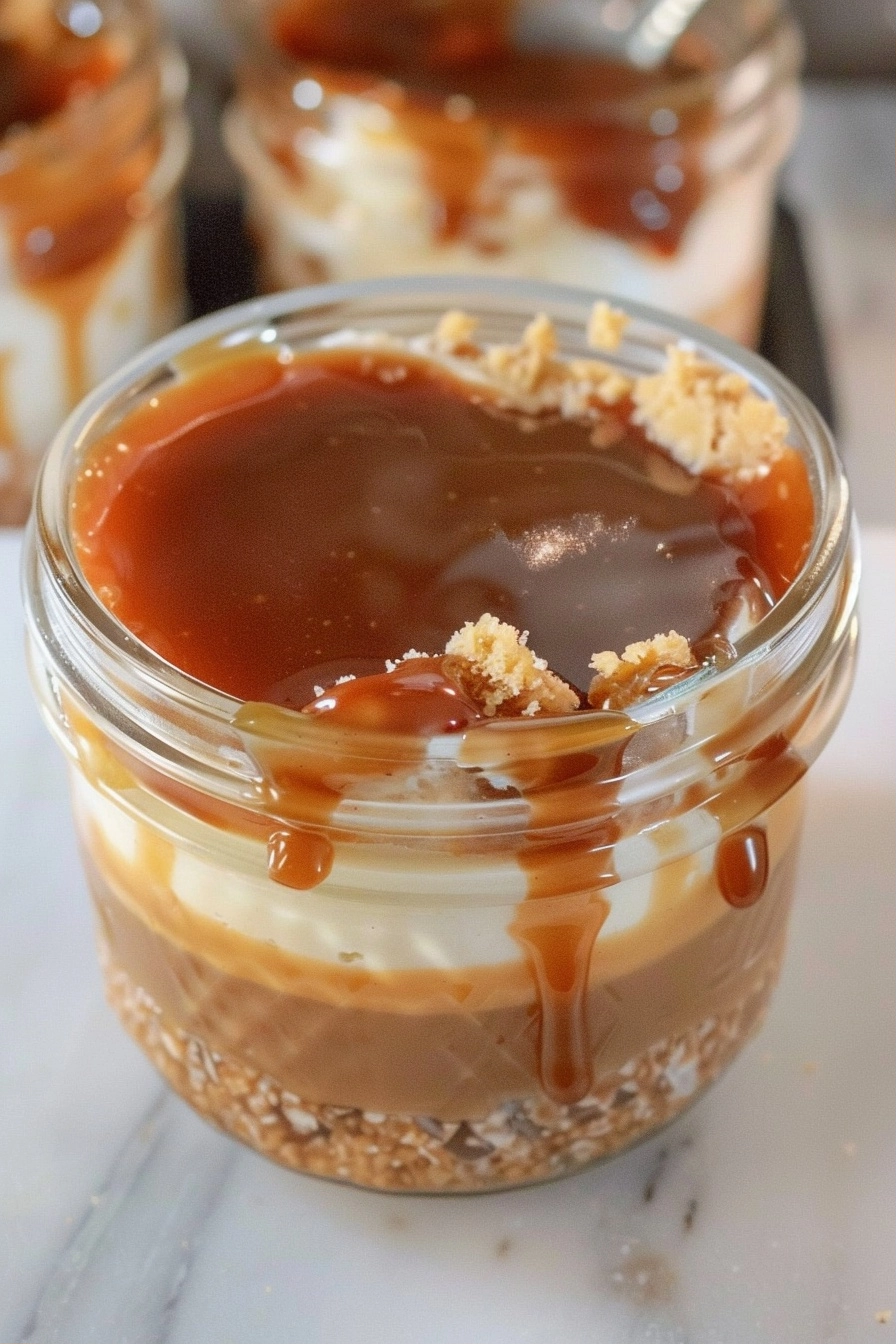
Caramel drip cheesecake jars provide an indulgent handheld dessert featuring layers of creamy cheesecake filling, crushed graham cracker crust, and rich golden caramel sauce. These individual portions combine convenience with sophisticated presentation for any gathering or sweet craving. You can prepare these decadent treats in minutes without needing an oven or complex baking techniques to achieve a professional aesthetic.
| Prep Time | Cook Time | Total Time | Servings | Difficulty | Cuisine |
|---|---|---|---|---|---|
| 20 mins | 0 mins | 20 mins | 6 | Easy | Modern American |
Why This Recipe Works
This recipe works because the balanced ratio of tangy cream cheese to sweet, buttery graham crackers creates a classic flavor profile that appeals to everyone. By utilizing individual jars, you eliminate the stress of slicing perfectly clean wedges from a traditional springform pan.
Personal experience confirms that the addition of whipped topping provides a light, airy texture that prevents the filling from becoming overly dense. The visual appeal of the caramel dripping down the sides of the glass jars makes these treats look like they originated from an upscale bakery.
Ingredients
| Ingredient | Quantity | Notes |
|---|---|---|
| Cream Cheese | 16 oz | Softened to room temperature |
| Powdered Sugar | 1 cup | Sift to remove lumps |
| Vanilla Extract | 1 tsp | Use pure extract |
| Whipped Topping | 8 oz | Thawed completely |
| Graham Crackers | 1.5 cups | Finely crushed crumbs |
| Butter | 4 tbsp | Melted |
| Caramel Sauce | 0.5 cup | Thick pourable variety |
Step-by-Step Instructions
Preparing the Crust
- Combine graham cracker crumbs and melted butter in a small mixing bowl until the mixture resembles wet sand.
- Divide the mixture evenly into the bottom of six small mason jars or dessert cups.
- Press the crust firmly against the bottom of each jar using the back of a spoon to create a stable base.
Creating the Filling
- Beat the softened cream cheese, powdered sugar, and vanilla extract in a large bowl until the mixture is smooth and fluffy.
- Fold the thawed whipped topping into the cream cheese mixture gently to maintain volume.
- Transfer the cream cheese filling into a piping bag or a plastic zip-top bag with the corner snipped off.
Assembling the Jars
- Pipe a layer of cheesecake filling over the crust in each jar until they are about two-thirds full.
- Drizzle a generous tablespoon of caramel sauce over the cream cheese layer.
- Add the remaining cheesecake filling to the top of each jar and finish with an extra decorative drizzle of caramel.
Chef Tips for Perfect Results
- Ensure your cream cheese is completely at room temperature to avoid lumps in your final filling.
- Use a food processor to crush your graham crackers into fine, consistent crumbs for a better texture.
- Pipe the filling carefully against the glass sides to create clean layers without smearing the edges.
- Chill the jars in the refrigerator for at least one hour before serving to allow the flavors to set.
- Warm the caramel sauce slightly if it is too thick to drizzle properly from the jar.
Common Mistakes to Avoid
Overbeating the whipped topping causes the air to escape, resulting in a flat and heavy texture. Keep the folding process light and intentional to preserve the fluffy consistency required for this dessert.
Using cold cream cheese creates a lumpy texture that is difficult to smooth out once combined with the sugar. Always pull your dairy items out of the refrigerator thirty minutes before starting the assembly process to ensure success.
Variations and Substitutions
| Ingredient | Substitution | Impact on Flavor |
|---|---|---|
| Graham Crackers | Vanilla Wafers | Adds a sweeter, buttery undertone |
| Caramel Sauce | Chocolate Ganache | Changes flavor to a deep cocoa profile |
| Whipped Topping | Heavy Whipping Cream | Results in a richer, more dense mousse |
Serving Suggestions and Pairings
Serve these jars at dinner parties or summer picnics for a mess-free dessert option. They pair exceptionally well with fresh berries or a sprinkle of sea salt to cut through the sweetness of the caramel. For a warm beverage pairing, offer a cup of freshly brewed black tea or a decaf coffee to balance the creamy profile.
Storage and Reheating
| Method | Duration | Instructions |
|---|---|---|
| Refrigerator | 3-4 days | Cover tightly with lids or plastic wrap |
| Freezer | Not recommended | Texture of whipped topping degrades significantly |
Nutritional Information
Approximate values per serving.
| Nutrient | Amount per Serving |
|---|---|
| Calories | 340 kcal |
| Total Fat | 22g |
| Carbohydrates | 35g |
| Protein | 4g |
| Sugar | 28g |
Frequently Asked Questions
Can I make these jars ahead of time?
You can assemble these jars up to 48 hours in advance for your event. Keep them refrigerated until the exact moment of service to maintain the best structural integrity.
How do I fix lumpy cheesecake filling?
You fix lumpy filling by continuing to beat the mixture on medium speed until the cream cheese incorporates fully into the sugar. If the mixture remains lumpy, you can pass it through a fine-mesh sieve before folding in the whipped topping.
Why is my caramel sauce pooling at the bottom?
Your caramel sauce pools at the bottom when the cheesecake filling is too soft or warm during assembly. Ensure your filling is chilled and thick enough to support the weight of the caramel layer.
Can I replace the graham crackers with gluten-free options?
You can replace the graham crackers with gluten-free ginger snaps or crushed gluten-free biscuits. These alternatives provide a similar crunch and work perfectly well within the layering structure.
How can I tell if the filling is firm enough?
The filling is ready when it holds a stiff peak shape on the end of a spatula or whisk. If it looks runny, continue to whip the cream cheese longer before adding the topping.
Mastering these caramel drip cheesecake jars guarantees a reliable dessert that looks as good as it tastes. The combination of simple pantry staples and elegant layering creates a sophisticated outcome for any occasion. Once you finish that last bite, you will understand why this method is the ultimate shortcut for cheesecake lovers. Enjoy the blend of smooth cream and rich, golden caramel in every spoonful.
PrintCaramel Drip Cheesecake Jars
These indulgent, individual cheesecake jars offer a sophisticated, handheld dessert experience without the need for an oven. Each jar features a buttery graham cracker crust topped with a light, fluffy cream cheese mousse and finished with a decadent swirl of golden caramel. Perfect for gatherings or quick cravings, these no-bake treats provide a professional bakery aesthetic that is as easy to assemble as it is delicious to eat.
- Prep Time: 20
- Total Time: 20
- Yield: 6 jars
- Category: Deserts
- Method: No-Bake
- Cuisine: Modern American
- Diet: Vegetarian
Ingredients
16 oz cream cheese, softened to room temperature
1 cup powdered sugar, sifted
1 tsp pure vanilla extract
8 oz whipped topping, thawed
1.5 cups graham cracker crumbs
4 tbsp butter, melted
0.5 cup caramel sauce
Instructions
Combine graham cracker crumbs and melted butter in a small bowl until it resembles wet sand.
Divide the crumb mixture evenly among six jars and press down firmly to create a stable base.
Beat the cream cheese, powdered sugar, and vanilla extract in a large bowl until smooth and fluffy.
Gently fold the thawed whipped topping into the cream cheese mixture.
Transfer the filling into a piping bag or a large plastic bag with the corner snipped off.
Pipe the filling into each jar until they are about two-thirds full.
Drizzle a generous tablespoon of caramel sauce over the cream cheese layer in each jar.
Notes
Ensure your cream cheese is truly at room temperature to avoid lumps. For a clean look, wipe the interior sides of the jars if any filling touches them before adding the caramel. Keep refrigerated until ready to serve for the best texture.